
Challenge 1 - Batch Painting to Table Top Standard
Dan KellyFor this first challenge, we will take at least 5 models from the same squad or unit and get them table top ready. This will involve at least one shade or highlight with all models being painted to the same standard.
In the spirit of batch painting, you should be working across all 5 miniatures simultaneously. We aren't looking for competition paint jobs here, the aim is to move fairly quickly and get something that looks good on the table top at arms length
If you are comfortable doing this please carry on, but if you would like some guidance or would like to see my approach to doing this then please read on...
What will you need:
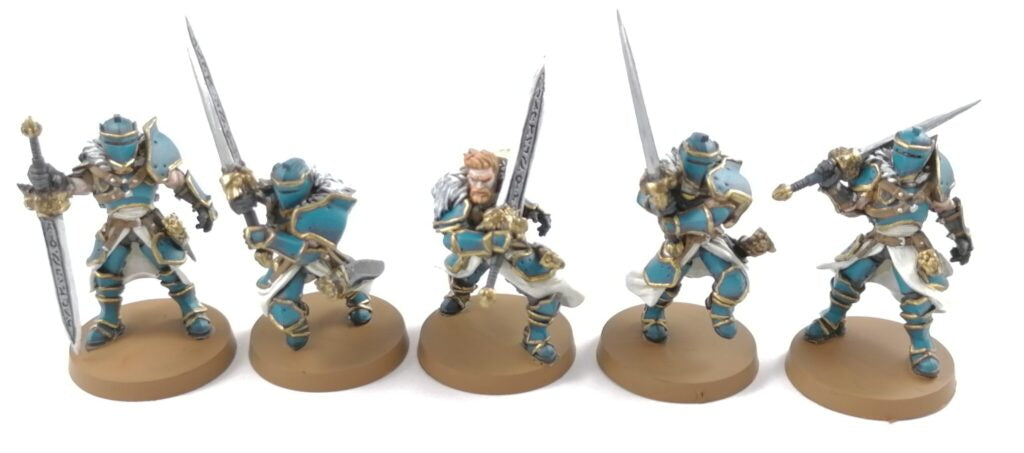
Models! This tutorial will cover the painting of a unit of 5 Kingsguard with Greatswords. They are available as presupported STL files here: Kingsguard Greatswords (presupported STL) at My Mini Factory
If you do not have access to a 3D printer, you can also buy them in resin at my Only-Games store and the quality is excellent. Resin Kingsguard Greatswords at Only-Games
Primer
- A selection of paints – For this tutorial I’ll be using a 2 layer system applying a darker base colour then a lighter mid tone on top. We will save highlights for the advanced level as its not strictly needed to get the models Tabletop Ready. The paints I have used for this tutorial are as follows:
- Armour: Citadel Stegadon Scale Green > Citadel Sotek Green
- Armour/Weapon trim: Vallejo Armour Brown > Vallejo Old Gold
- Skin: Citadel Cadian Fleshtone > Vallejo Pale Flesh
- Leather: Vallejo Chocolate Brown > Vallejo Flat Earth
- Cloth: Citadel Ushabti Bone > Vallejo Ivory
- Trousers: Vallejo Black > Citadel Eshin Grey
- Fur Collar: Vallejo Chocolate Brown > Ushabti Bone
- Weapon Blade: Vallejo Gun Metal > Vallejo Steel.
- Paint Brushes! Size 1, 0 and maybe a 3/0 for fine details.
- 2-3 Water cups – One for diluting paint and one to wash your brush in. You may want a separate one for washing brushes after using metallics but you could just change the water after you've done them.
- Palette
- Paper Towels
- Surface protection – If you don’t want to feel the wrath of your other half or parents, put some news paper or plastic sheeting or something down to protect your work surface from paint splashes and spills!
- A Notebook and Pen – if you're using your own colour scheme, write down your colour recipes for each unit. Record the steps you take, the paints you use and the ratios you mix, just like you’re writing a recipe for a cake or some other culinary delight! Theres nothing worse than having a few weeks gap between painting where you’ve tidied your desk (HA!) and put all your paints away, then you can't remember what paints you used on the first half of your unit! You could alternatively try an app such as PaintRack (though you'll need to spend time here populating your colour library first)
STEP 1 – PREPARE YOUR MODELS
The first thing you need to do is get all of the supports off your models as they will show up and ruin a good paint job.
My supports don’t tend to leave much in the way of marks and what is left clean up easy enough using a sharp craft knife (I actually use a scalpel – they can break easier but as long as you use super sharp blades they work amazingly well – just don’t let them blunt or they become more dangerous as you apply further pressure.)
A light bit of sanding if you need to, especially on the bottom surface that will be glued to the base. Add the glue to the bottom of the feet and fix them to your base and we’re good to move on to the next step.
I’ve stuck mine to a baton of balsa wood so I can spray all 5 at once, but if you’re not comfortable with this, base them individually and just working on one at a time is fine too. EDIT – it turns out that this was a terrible idea! when I removed all of the minis from it after spraying, there were balsa splinters all stuck to the feet that were a pain to remove! I now keep a baton of normal soft wood instead!

STEP 2 – PRIMER
You can buy lots of primers in different colours these days – it doesn’t matter which you use but it is important that you prime your models. Why? Because it helps the paint to stick to the model better and stay on the model! To get the paint on the model and keep the detail visible, we’re going to be watering our paints down, and when you put thinned paint onto bare plastic or resin or even metal, you usually get beading going on (where the paint separates on the surface of the model into individual spots of paint rather than a single solid layer). Most primers will also cure giving a solid base
Which colour primer? That’s up to you. A white primer will make your colours a little brighter. A black primer will darken the colours you apply on top of it but can save you lots of time when it comes to black lining, and shading, the model - I'll talk about this later but it’s basically a technique that will make the model read better on the tabletop by creating a clear distinction between 2 different colours. You could use a grey primer which gives you the best of both worlds, or even start with a coloured primer if your model is going to be mostly one colour as this will save you time too.
How to apply it? Shake the can thoroughly for a good 30 seconds to a minute – feel the pain in your arms as you go! The burn is a good sign that you’re doing it right and means you’ll have burned a few extra calories so you can treat yourself to a snack while your primer dries! Go outside when it’s not windy or wet out and put some dust sheet or something down so you don’t overspray and ruin your patio! Hold the can at arm's length about 30cm away from the model and moving your arm from left to right in a sweeping motion, press the cap of the spray can as you are in line with the model and give it a light dusting as your hand passes across the models for a second. Rotate the model holding its base and then spray both sides and the back too.

If the paint looks shiny or starts to drip, you’re applying too much in one spot and are either too close or not moving enough. It all takes practice so don’t beat yourself up if you get it a bit wrong the first few times.
If you don’t get into all the nooks and crannies that’s not really important as the raised surfaces are where the paint will come off with handling without the primer and you can always go in with a brush to apply some paint to any bits you miss.
You can also use an airbrush (if you have one) to apply primers or even a brush, just be sure to add a touch of water to your paint so you don’t fill in the details. I’ll be using Vallejo black polyurethane primer applied with an air brush but that’s just because I have this available to me and I prefer the slightly darker effect the black primer gives.
STEP 4 – BLOCKING OUT BASE COLOURS
You’ll need to decide on your colour scheme, so at this point it's worth trying to figure out what colours you want to use where. I’ve listed the paints I’ll be using at the top of the page if you are following along, but otherwise you’ll need to find a dark tone and a mid-tone of each colour that you’re going to be using. Grab the mid tones of each colour from your paint collection and then find a corresponding darker shade of the same colour. There may be a bit of trial and error here and not all darker versions of a colour will be compatible so be prepared to experiment a bit first..
| TIP – Paint one model in full first so you can see your colour scheme completed. Once you’ve done this one, paint each colour on ever model before moving on to the next. By the time you’ve painted the last one, the first one should be ready to revisit so you can work through with minimum down time (except the planned toilet breaks, snack breaks, brew breaks etc – very important so don’t forget them – particularly the toilet breaks as your painting is going to be awfully wobbly if you’re battling a bursting bladder!). |
| TIP – You don’t have to be too neat on the earlier coats. If you get paint on something that hasn’t been painted yet then ignore it! you only need to worry about touching up areas if you have painted them already and get another colour on there – and even then you might be able to get away with it if its not too noticeable! |
| TIP – All painters have at least one good stroke! Find it! a short downward stroke is the easiest to work with and this may mean you have to rotate the model a lot to get to everything and that’s fine! Just be sure the previous bit of paint has dried before you start handling it. |
The best order to apply paint in would be the order in which the model would have had to get dressed so that you are applying inner layers first and outer layers last - that way you have less opportunity to overpaint areas you've already done
If you can be careful about the paint application here and keep a little line of black between colours you can save yourself a lot of time later on but we can always tidy this up later if needed.
Paint any exposed skin first – arms and faces in the case of the Kingsguard. If you have a face to paint, you can either leave the eyes and mouth black, or go back in with one of your darker brown colours and paint them in afterwards – this might be a good time to break out you 3/0 brush, and don’t forget your breathing!

I then paint the trousers, the leather boots and gloves in black. This bit is REALLY easy if you’ve already primed the model black like I have! 😊 nothing new to show in this step!
The Cloth skirt and abdomen are painted in Ushabti Bone.

Next will be the armour plates which will get a coat of Stegadon scale green.

All areas that will eventually be painted gold will be painted in Armour Brown - the armour trim plus the hilt and pommel of the sword.

The Sword blade and metal ring on the chest will be painted with Gun Metal.

Finally, the leather straps and belts and the Fur collar will be painted with Chocolate brown.

STEP 4 – ESTABLISH THE MID TONES
Once all of your base tones are on, work in the same order as before and apply the relative mid tones, leaving a small amount of the base colour showing around the areas that would be in shadow. This is another area that would need a little bit of experience, but ultimately it doesn’t have to be perfect for units.
| TIP – If you can’t figure out where to put highlights, you could try using zenithal highlighting for your primer and take a few reference photos before you start adding your base colours. Take a few reference photos so you can refer back to that and any areas that are white are where you should apply your highlight and the areas that are black should be left in your base tone. |

Use Ivory to pick out the edges and raised areas of the skirt and abdomen areas. With the fur collar, we’re going to create a bit of an effect with this using ushabti bone as a dry brush.
To do this, get an older brush or one you don’t mind ruining as its going to take a beating! dip the bristles in ushabti bone as normal, but this time wipe off as much paint as you can on the paper towel until the brush appears dry (hence the term “dry brush”). now take the dry brush and drag it from top to bottom on the fur areas. Try to be careful in your application so you don’t get paint on anything else. If it looks grainy, you probably haven't taken enough paint off the brush. If nothing at all is picking up then you may need to try wiping just a little less away before applying. don’t try to rush this step or it could ruin everything!

Sotek Green on the armour plates will make them nice and vibrant. Then take the Gold and pick out the armour trim – ideally you want to leave a thin brown line between the Green and the gold to really make the trim stand out
.

| TIP – When painting the trim, if you have difficulty applying the paint with the tip of the brush, try using the side of the brush to graze over the raised edges. be careful not to touch other bits with the tip, but always remember you can go back and touch bits up if you need to. |
As with the armour trim, pick out the edges of the sword blade using the lighter coloured steel paint. Grab your Flat Earth and paint the outer edges of all of the straps leaving a darker band through the middle of the belts. All that remains is to paint the hair of any models that don’t have helmets. Be creative and go with your gut! Blonde, ginger, black, brown, white, grey or go full JRPG and use green, blue, red, purple or whatever takes your fancy!
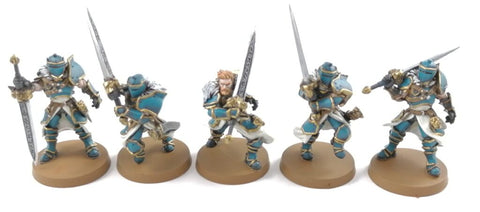
Now you can get them all based up nicely and finish the job!
So now you have a model fit for the tabletop! Next time we’ll take these same models and push them a little bit further to really make them look the part!