
Basing your Minis
Dan KellyA wise man once told me “when you paint a model, it’s all about the bases and faces!”
I’ll cover painting faces another time, but for now I’ll focus on the bases.
For those of you that don’t know me, I’m Dan Kelly, the owner and sculptor at Lion Tower Miniatures. I am a lifelong miniature painter and collector and have been doing this for a long time before I began to sculpt them! I used to be a prolific painter and converter of miniautres as well as a gamer, but since adult life has firmly taken hold, I now have a wife and 2 kids and a full time job sculpting – none of which I can complain about as all of this is wonderful! however it does mean my hobby time is severely in short supply, but I still love to paint whenever I can get a chance!
All hobbyists will have their own ways of doing things, and i want to show you my preferred method. its easy to get good results for the tabletop with few materials and simple techniques.
Not all models come with beautifully sculpted bases, but not all models need them either. Adding an overly elaborate base can lead to the model becoming drowned and lost by the excessive background detail of the base. Luckily it can be very easy to achieve a nice looking base for a model. Its possible to become a scenic god and get incredibly complicated, but I want to show you a relatively quick, simple and effective way of finishing off your models!
Before we start, an observation on bases…
I’ve been a miniature collector for 32 years now (and sculptor for the best part of 15 years), and talking to members of the 3d Printing community it is now clear to me that not everyone has the same background as me in traditional metal and resin miniatures, and it seems I’ve taken a few things for granted over the last couple of years.
You do NOT need to print bases all the time. you can buy bags of miniature bases for really cheap in either plastic or MDF or all manner of other materials.
Companies like Sarissa Precision sell all sorts of sizes of MDF bases suitable for RPG and wargame miniatures and they are cheap and great, while others such as EM4 sell the plastic bases.

Theres an anomaly that some of you will notice here in the plastic bases – specifically the SLOT in the plastic bases. For those who aren’t aware, for decades before 3D printing came along, miniatures were made in metal and plastic (and later polyurethane resin), and many of those miniature were supplied with a plastic tab between their feet which fitted into the slot on the base giving a solid and secure anchor to the base.
These days we all just put a bit of glue on the bottom of the feet and glue it to the base and hope for the best! 😊
You can buy all sorts of glues, but the ones you need for sticking a miniature to a base are just plain old super glue! you could try to get creative and try other things but honestly its so cheap and readily available you really should just go with it! the really cheap ones work just as well as the expensive ones too.
To follow along you will need:
- A model to base!
- Some sand – coarser sand works a little better
- Some cat litter or other very fine gravel
- PVA glue (I use the type used to seal concrete but that’s because I had to seal concrete once and have a 5L bottle of the stuff still in my office!)
- Any extra bits like skulls, rats etc that you want to print to add a bit of detail to your base.
- Super glue (cyanoacrylate) to stick on any basing details you want to add, and to fix the model to the base!
- Paints – a selection of earthy browns, greys and greens. For highlighting, a bone colour works well. if you want my recipe, I have used in this tutorial (All paints from Vallejo): Burnt Umber, Flat Earth, Medium Sea Grey, Sky Grey,
- A couple of paintbrushes including at least one old one that you don’t mind getting ruined or that already is!
- Grass Tufts (optional)
- Static Grass (Optional)
So how to do it?
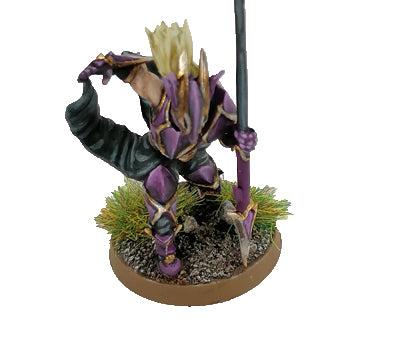
I will be demonstrating this on a model that is part of my Kickstarter range which I have painted. he is Captain Abel of the Order of the Dragon. I have already painted his base using Vallejo flat earth, a colour that is ideal for bases and should definitely be in your tool box! The model does not come with a base so I’ve used one of the 25mm round plastic bases that I talked about further up. He was glues on using super glue and is pretty secure! You can base a model at this stage after painting or before the painting begins – either is fine, but you have to be extra careful if basing a model after you have painted it so you don’t ruin your paint job.

Step 1
Mix together your sand and cat litter in a small tub. you need about 1” deep ideally. If you can’t get these, you can actually buy bags of basing sand on amazon, ebay and all other hobby stores

Step 2
If you are gluing any extra bits to the base, do this now using superglue (cyanoacrylate). Let the glue dry thoroughly before proceeding to step 3 or the superglue will destroy your paintbrush!
Step 3
Add a touch of water to a small amount of PVA glue on a mixing palette – just enough to help it flow a little. brush the glue all over the TOP surface of the base only, being careful to avoid the feet of the model.
Tip – if you are struggling to get the PVA glue to stay one the base (sometimes it just wants to bead up and wont coat the base evenly) try painting the base with a nice matt paint first so the glue will have something to grip on to.

Step 4
Whilst the glue is still wet, holding the miniature carefully so as not to trash your paint job or break the mini, put the base into the sand, twisting gently until the base is submerged in the sand mixture. Leave it there for at least a few minutes to give the glue a chance to dry. Go make yourself a brew and grab a snack or something…no, stop touching it, leave it alone and come back in a few minutes!

Step 5
Remove the model from the sand pit, give it a gentle shake and a little tap to get some of the excess. don’t be too vicious with it as the glue may still be wet and you’ll end up losing material off the base. Let it dry thoroughly!

Step 6
Apply some paint! I tend to start with a dark brown colour like burnt umber on over all of the sand to start with and then paint the rocks in something suitably rocky like a dark grey – in this case I’m using Vallejo Model Colour Medium Sea Grey.
Apply paint sparingly and water it down to about a 50:50 mix of water to paint. better to add multiple layers. It won’t take long to dry between layers so it’s not too time consuming and will give you a better finish every time than lots of paint applied in a single thick layer.
If you have large areas of grey or brown you can put a few diluted splodges of green or brown on there
to break up the colour masses. If you do this I suggest diluting the paint to 1 part paint to 4-5 parts water so its just a light tint going on and apply it using little blobs so it runs into the crevices. if it dries and you want more colour, repeat again or switch up and use another colour. experiment all you like!
Also if you have any other bits you added to your base now is the time to paint them

Step 7
Wet Brushing! So in this stage youre going to ruin that brush! take your old brush and get your mid tone brown paint on it (I used Vallejo Flat Earth). scrub off some of the paint, but not all of it and then draw the brush lightly across the raised surfaces of the sand. You’ll see the burnt umber base in the lower part of the grain but the raised areas will now be coloured with your mid tone.
Repeat the same with the rocks using your lighter shade of grey (sky grey for me).

Step 8
Drybrushing! so any of you not familiar with this technique – it will become your best friend for basing and for other things like terrain. it can be used on your models too but it can have horrible results if not used sparingly or correctly.
Take an old brush – its going to really take a beating so don’t go using your best Windsor and Newtons on it!!! Dip the brush in a bone coloured paint. I’m using Vallejo ivory. don’t dilute the paint this time, but once you have the brush coated, wipe it all off on kitchen paper! keep going until there appears to be nothing left on the brush and no marks are left on a clean bit of the paper. Then gently brush over the textured surfaces. be REALLY careful not to get paint on your actual model!!

Step 9 (Optional)
Corrections!
So I think I left a little too much of the ivory paint on my brush for my drybrush so its got a bit too much coverage and a chalky finish. not to worry though! I’m going to use a Games Workshop contrast paint called Wyldwood to get my contrast back. you could put a wash of the burnt umber over the top or if you have these kind of glazes available to use give them a try. This one is particularly high in pigment so I’ll be watering it down to about 50% strength before applying. it’s still a little wet in the photo but you can see how its darkened it all back down a bit.
When the glaze is dry repeat the drybrush in step 8 (PROPERLY THIS TIME THOUGH DAN!!)

Step 10
Paint the rim of the base. You can use black, or brown or any colour you like really! I use good old Vallejo Flat Earth for a nice neutral finish so as not to detract from the model too much. If you’re painting A fantasy Football team for example you could go to town with this and use your team colours on the base rim to help identify them on the table.

Step 11
To finish I added one and a half grass tufts to the base. these come on a sheet and have a self-adhesive glob of glue on the underside so you can just press them straight on where you want them. I thought 2 was a bit much so I chopped one in half with a scalpel and added it next to the rock on the front of the base. They come in different colours and different lengths so don’t be afraid to do a bit of mix and match (though I’ve currently only got the one pack to hand – “6mm rough grass” from Warpainter.net.
For those of you following along with an unpainted model, I would leave the grass tufts until right at the very end after the model is painted so they dont get in the way of your paint job, and so that you dont accidentally splash paint all over your grass!
If you don’t have or can’t get the tufts (or just don’t like the look of them) you could add a few blobs of PVA wherever you like and dip it in your flocking material of choice – static grass will give you a similar look to the tufts but with a less regular look, and others such as ground foam and the sawdust based flocks that they use for model railways can give you a more scrubland look. again, you can mix and match to suit your own needs.

Alternative bases
If you just want a nice simple flagstone base for a dungeon theme you can get a set of printed resin bases from our webstore for a fairly reasonable price just below. If you have a 3D printer and want some free ones to try at home, click the image to the right for a set of free bases from my MMF store.
Here’s an example of one of these flagstone bases painted. I painted them using the same wetbrushing and drybrushing technique as described above and then I used very thin layers of watered down red paint and blue paint to tint a few of the flagstones to add some variety and break up the colour. If you do this step, be sure to wipe a lot of the paint off the brush before applying it as you don’t want it to pool up and run around uncontrolled – just a topical application in specific areas.

Thanks for reading, and happy hobbying!!