
Glow Big or Glow Home! OSL Painting Challenge
Dan Kelly
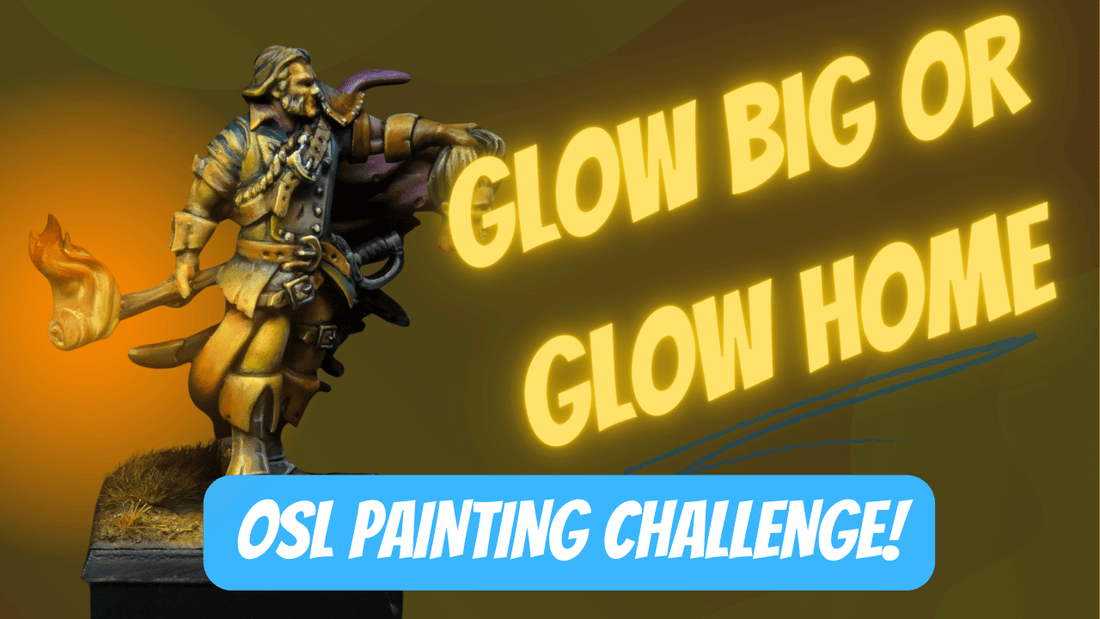
Cristof, Witch Hunter - painted by Nathanael Gudgeon (aka Judge Gudge)
Glow Big or Glow Home: Mastering Glow Effects in Miniature Painting
Creating glow effects in miniature painting is like adding a splash of magic to your models. Whether it's the ethereal glow of a wizard's runes or the menacing eyes of a magical creature, mastering this technique will make your miniatures stand out in the most illuminating way. But don't worry, we're here to light the way with some detailed steps and tips, sprinkled with a bit of humour to keep things bright!
Difficulty Level:
⭐⭐⭐☆ ☆ (Medium)
Challenges:
Keeping the glow effect natural and ensuring smooth transitions between colours.
Step-by-Step Guide to Glowing Glory:
1. Basecoat: Start by painting your model as you normally would. However, keep the areas you want to glow darker than usual. This will help make the glowing effect pop. Think of it as saving room for dessert after a hearty meal—you want to leave some space for the best part!
2. Glow Base: Next, paint the glowing area with a bright colour. For magical runes, a bright blue or green works well. It's like choosing the flavour of your glow—make it vibrant and eye-catching! Obviously for fire, you'll want reds, oranges and yellows, but its your call.
3. Highlight Glow: Mix some white with your bright colour and apply it to the centre of the glowing area. This is where the magic happens! Imagine this step as adding the cream filling to your glowing doughnut—it makes all the difference.
4. Glow Reflection: Lightly drybrush the bright colour around the glowing area to simulate reflected light. This step is crucial for making the glow look realistic, as if it's actually casting light. It's like giving your glow a little extra hug, spreading the light gently around the source.
5. Final Touches: Add tiny dots of white to the very centre of the glowing area to enhance the effect. These dots are the cherry on top, the final sparkle that makes your glow truly shine.
Bonus Tips for Gleaming Success
-
Blend Like a Pro: For a more natural look, try wet blending the bright colour into the surrounding area. This smooth transition will make the glow appear more organic and less like a neon sign.
-
Layer Up: Don't be afraid to build up the glow in layers. Start with a lighter application and gradually add more intensity. This will help you control the effect better and avoid overdoing it.
-
Use a Glaze: Consider using a glaze medium mixed with your bright colour to create a translucent glow effect. This can add depth and make the glow appear more realistic.
-
Keep it Light: Remember, less is often more with glow effects. Subtlety can be just as striking as a full-on glow if done right. Think of it as a gentle glow, not a blinding spotlight.
-
Experiment with Colours: Don't limit yourself to just blue or green. Experiment with different colours like red, purple, or even yellow, depending on the magical effect you're trying to achieve.
With these steps and tips, you'll be lighting up your miniatures like never before. So, grab your brushes, pick your brightest colours, and get ready to glow big or glow home!
Recommended Miniatures
As with Judge Gudge's example above, you could use Cristof the Witch Hunter, or if you feel like really challenging yourself, you could even try your hand at our Ifrit miniature!
