
Getting started in Resin 3D printing - Calibrating your Printer
Dan KellyShare
When starting resin 3d printing, one of the first things you need to do is to calibrate your printer. There are a lot of variables that can make a print fail, so its best to eliminate as many of them as possible in the early stages. Here are some simple instructions and tips to help you get the best from your printer. I'm not going to assume you have any prior knowledge so apologies is some of this article is a little obvious - some of you will be thanking me for this I'm certain!
If you've just got a new printer, make sure you follow the printers setup guide, and ensure you've removed all protective films from the screen VAT etc (though don't remove any preinstalled screen protectors!) Then we'll get on with calibrating your printer for perfect prints!
Before we proceed, I want to just give you a bit of sage advice...3D printers are designed to work - if it doesn't work, you don't need to try hacks to make things work! short of a machine defect, you can almost always solve your problems by following the advice below and adjusting your settings! You should never need to sand your build plate or add any kind of lube to your resin tray film ever!!! I mean for the latter, the film itself is a teflon based material which is by its very definition non-stick anyway - why add a PTFE (teflon) lubricant to a PTFE film?!
1 Level your build plate.
This will vary for each printer so its important to follow the manufacturer's instructions. Typically you will need to lower the plate to the screen with a piece of paper between the plate and the screen, then loosen off a series of screws on the plate, before lowering the plate onto the screen, applying some pressure and gently and incrementally tightening up the screws again. If you're successful, you shouldn't be able to pull the paper free from under the build plate.
TIP: its best to cut the paper into 1" wide strips so it will help you to pinpoint any loose spots on the plate.
TIP: Never fully tighten any screw in one go. Instead, turn each screw a quarter of a turn before moving onto another screw that is as far away as possible from the last one. Repeat this process until all screws are fully tightened.
TIP: Not all printers will need this step, but if you need to press "Set zero" as part of your levelling process and you fail to do it, your printer just won't work, so be sure to follow all of the manufacturer's setup instructions very closely!
2 Check the room temperature!
So many fails will be the result of having the wrong room temperature, so its important to know this: The Resin works best over 21C where it is less viscous (thinner) and will take details better. You should aim to calibrate your printer at 21C or higher, but be prepared to maintain that temperature AT ALL TIMES! If the temperature drops, the resin will become more viscous (thicker) and require a longer exposure time than you have calibrated for and that will cause your prints to fail mid way through.
TIP: The room temperature is a good guide, but if your resin has just been delivered or has been stored in a cold area, you will need to allow it to come up to temperature before you print. You may have your room at 21C, but your resin may be 10C and that's still going to result in fails.
3 Fill the resin tray/vat
This one may seem simple but there are a few tricks to it. Just pour some resin into the vat (the resin tray). Fill it to around 1/3 full to start with, and then top the vat up once printing begins and your build plate is submerged in the resin (I know it may seem obvious to some of you, but the build plate will fully submerge into the resin, and the volume of the plate will displace some resin, so if you fill the vat to the brim without the build plate, you're going to end up with a very unpleasant mess to clean up very quickly!!
TIP: 3D Printer resin is comprised of several chemical components in very precise ratios. If you leave your resin to stand for any period of time, these parts will separate out. It isn't a problem as a good shake in the bottle or a thorough stirring in the resin tray will help to mix them all back together. The resin should be one solid colour, so if you see any marbling in the resin this is an indicator that it needs more mixing before use.
TIP: If your prints fail, you'll need to empty the resin tray and strain the resin through a paint strainer to remove any debris before reusing it. The debris can be harmful to your printer and cause damage to your screen if it is left floating in the resin. Otherwise its perfectly acceptable to just mix it up again and print when you're ready - I've left resin in a resin tray for months unused and then stirred it back up and gone on to use it for successful printing like I'd never even neglected it in the first place!!
4 Decide on your layer height
APOLOGIES, THIS SECTION COVERS A LOT OF INFORMATION!
The first thing to know here is that the lower the layer height, the less visible your layer lines will be. If you're going to be drybrushing a lot or you really value the surface quality and detail of your prints then you want as low a layer height as you can get away with. If you want fast prints and the quality isnt quite so important (like for gaming terrain pieces for example) then you can go up to 50 microns and gain some speed and still have far better quality than FDM prints, or you can sacrifice the quality altogether to get something on the table fast and go up to 100 micron!!
All layers will require an amount of mechanical movement up and down, plus usually a little "light off" delay to help improve the print quality. In the middle of all of this movement time we'll have the actual "exposure", which is where the LED lights up and the screen masks off the areas that are not to be cured. The light travels through the opening in the screen mask and selectively cures the silhouette of the slice between the tiny gap between the build plate and the base of the resin tray.
Thicker layers will require more exposure time than thinner ones, but there will be less of them, so whilst you gain more exposure time per layer, you'll save on layer count and all of the mechanical movement. Figures for each printer will vary so lets use some fictional figures for an example. Say the mechanical movement per layer is 5 seconds in total. "Light off Delay" is set at 3 seconds and then we add our layer time to that. At 25 Microns layer height (for high quality prints), the exposure is 2 seconds for a total layer time of 10 seconds. A standard humanoid model comes in around 2500 layers at this resolution, so we're looking at around 25,000 seconds (just a shade under 7 hours) to complete the print. If we change that to 50 microns, the mechanical movement and light off delay are unchanged, but the exposure time is now 3 seconds for a total of 11 seconds a layer. However doubling the layer thickness also halves the layer count, so we are now only printing 1250 layers. This will take 13750 seconds (a touch under 4 hours).
For the best quality miniatures I've found 25 micron to be optimal - a good balance of both high quality and speed. Going higher than 25 micron leads to more visible layer lines in the finished painted models, and going lower than 25 microns doesn't give you any tangible improvement in quality but exponentially increases the print times required. If you're not painting high quality display paint jobs and the models are gaming pieces for personal use then 50 micron layer height should be fine for you. If however you're a perfectionist like me, love your miniatures, paint to competition levels or are selling your prints commercially, then you shouldn't be considering anything other than 25 Microns!
Now, knowing all of this, choose your preferred layer height!
5 Slicers
There a good few around now and your printer may require you to use a specific one, but given the choice I would use (and recommend) Lychee Slicer every time. Lychee has a library of printer profiles and corresponding resin profiles, so you can find the one that closest matches your requirements and use that as a starting point. Why only a starting point? Well it turns out that not all printers are the same and there are environmental factors that can also affect the exposure requirements. For example,Ty at Tabelflip Foundry and I both purchased a Sonic Mini 4K at around the same time. We both used the Phrozen Aqua 4K resin and both printed at 25 Micron Layer Height. I'm in the UK and Ty is in Omaha, and whilst Ty got a 2 second exposure on his printer, I had to use 2.6 seconds on mine which is a significant difference! So pick a profile as a starting point, but always test it and refine it yourself if needed.
TIP: Some resins (Elegoo in particular I have noticed) advise of exposure times on their bottles. If the advised times are in the 7-12 second region, it is likely that these relate to 1st generation 3D printers that used an RGB screen. These had longer exposure times than the current standard Mono screens which to my knowledge have been on all new 3d printers since at least 2021. Your exposure time should sit somewhere between 1-3 seconds, so unless you are using a first generation Elegoo Mars or Anycubic Photon etc, please ignore any advice for longer exposure times.
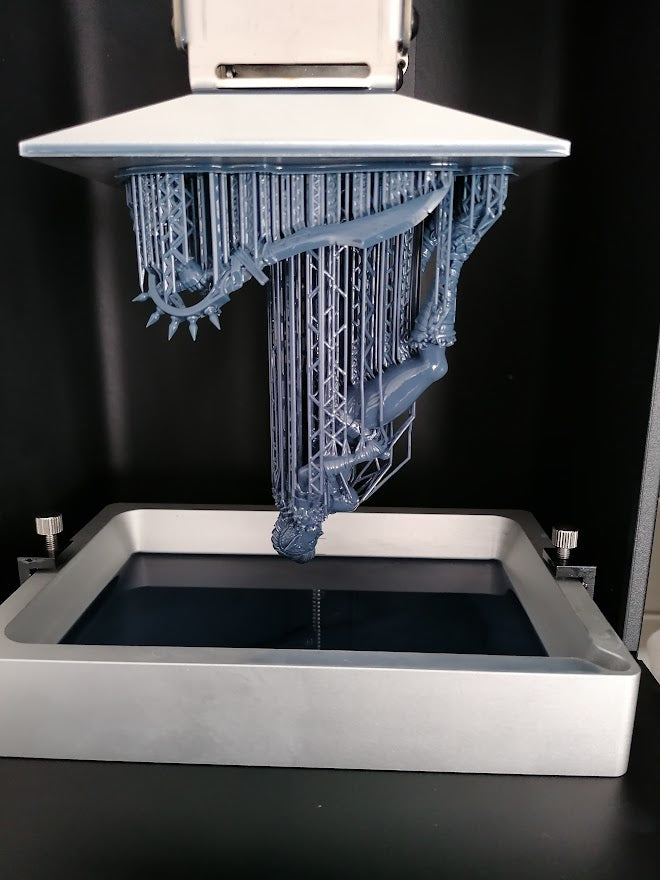
6 Calibration prints
You'll need some good calibration tools to help you get up and running. There are some really helpful ones out there and some less so. Here's my preference for calibration tools:
First I use the Phrozen XP Finder tool as its relatively flat and takes 10-20 minutes to print depending on your layer height. It's fairly easy to read and the main thing to look for is that the number of holes is equal to the number of corresponding "posts" If it is overexposed, drop the exposure a touch and reprint. If it is under exposed, increase the exposure a touch and reprint. Typically in 0.1 second increments is ideal if dealing in mono printers (unless you think you're way too far out and then make an informed decision about how to adjust. Lather, Rinse and Repeat until you have your perfect calibration.
Once I have what I believe to be a good calibration, I run the Cones of Calibration from Tableflip Foundry. This helps to ensure that supports will print properly. There are degrees of success, but a "perfect calibration" should have all of the cones on the Success side fully formed, and none of the cones on the failure side, though as long as the cones at the extreme ends of this have behaved as expected you should be OK to start printing.
A final shout out goes to the Ameralabs Town print, which is great if you need to know more technical information about the resin properties. When you click the link it will take you to their information page that explains what the print is able to show you and how to read it. Its quite a technical piece, but Ameralabs are real professionals and they know their stuff so I trust their expertise!
TIP: For best results, place just the one calibration piece in the center of the build plate and print it on its own.
7 Print some models!
This is the true test of your calibration efforts and you'll want to jump in with a massive list of figures you're desperate to print, but I need to offer a warning!! Not all supports are created equal!! Over the years it has become an expectation from customers that creators like myself offer models supported for customers to print. For many this means they quickly put the model into Lychee or Chitubox, run some auto-supports and put the files out without so much as a second thought, and you';ll hear horror stories online about the state of some of these presupported models. For me particularly, this has never been a concern as I sell resin prints in my store, and as my time is a premium I would rather not spend loads of time cleaning up models once they've printed. I've spent a lot of time and effort learning about how to be efficient with and optimize supports on models for perfect printing and ease of support removal with the minimum of additional work. Therefore, go and grab some of our FREE STL files and use them before anything else as I guarantee that with a good calibration you'll get perfect prints and you'll be able to see what you should be expecting from presupported files!
8 Trouble Shooting
So things don't always go to plan and sometimes you can find that your printer isn't working as it should and you don't know what to do. At this point the best thing you can do is be systematic about it. If you want to actually learn from the experience you need to know what went wrong and how you fixed it so that you can recreate that again in the future if the issue reoccurs. Therefore, though you may have received 10 different bits of advice from your Facebook group, applying all of them at the same time may fix the problem, but you won't know which one worked and you may end up sacrificing a chicken and rubbing beeswax on your forehead every time you want to run the printer when all you needed to do was warm the resin a bit. Just try one fix at a time, assess its effectiveness and either accept it as a win or discard it as a viable option altogether! If all else fails, join our Discord server and come and ask for help and we'll all chip in to help get you off the ground!